 Flow Toolkit for Power Automate
Guide
What the extension adds to Power Automate, and how to use it. Start with the three steps and the features to try first below; after that, jump to what you need.
Start here
Power Automate has two flow designers: the modern one, which opens by default, and the classic one. The extension opens your flows in the designer you choose, and adds its features to the classic designer.
- Click the extension icon in Chrome's toolbar and choose Classic. Pin the icon first via the puzzle piece, so it stays visible.
- Open a flow. It opens in the classic designer.
- Click in a field and open the Expression tab: you see the large editor. That is the first feature below.

Try these first
The rest of the guide is a reference: use the contents or the search to find a feature when you need it.
Writing expressions
Large expression editor
The expression editor of the classic designer is one line of about 330 pixels. The extension makes it 760 × 200 pixels, with word wrap, so you can read a long expression at once.

Make it your own size
- Drag the purple grip in the bottom-right corner of the editor to change the width and height. The text rewraps while you drag. The first time, a small hint points at it.
- Drag the grip in the bottom-right corner of the popup to make the whole popup taller or wider, on both tabs.
- The size is remembered, also in other tabs and on other computers with Chrome sync.
- Double-click a grip, or select Reset size in the settings window, to go back to 760 × 200.
Switch in the settings window: Large expression editor
Writing expressions
Function | Dynamic content
In the classic designer, dynamic content and expressions are separate tabs. The extension adds a switch below the editor, like in the modern designer, so you can put dynamic content in an expression without leaving it.
How to use it
- Open the Expression tab and type the start of your expression, for example
concat(. - Below the editor, choose Dynamic content.
- Type in the search box next to OK, for example the name of an action.
- Click a result: it goes into the expression at the cursor.
- Press Cmd+Enter or Ctrl+Enter, or select OK.
Good to know
- The search also finds items hidden behind See more, and all outputs of an action when you search for its name.
- The switch remembers your last choice for the next time.
- In a solution, the environment variables are folded at the top of the list. Click the header to show them; a search still finds them.
- Escape clears the search; a second Escape closes the popup.
- The switch and its search box need the Large expression editor. With the small editor, the popup works as Microsoft made it.
Switch in the settings window: Dynamic content search
Writing expressions
Bracket colors
A missing or extra bracket is easy to make in a long expression and hard to find; the designer only says the expression is invalid. The extension colors the brackets, like VS Code.

- Each level of
( )and[ ]has its own color: blue, green, brown, and then blue again. - With the cursor next to a bracket, that bracket and its partner get a box.
- A bracket without a partner is red with a wavy underline. Hover over it to see why.
- Brackets inside text between single quotes, such as
'Status (old)', do not count.
Switch in the settings window: Bracket colors
Writing expressions
Format an expression
A long expression on one line is hard to read. Two small buttons next to OK or Update put it over several lines, and back.
- Type or open an expression in the Expression tab.
- Select Format. Each argument of a call goes on its own line, indented one step per nested call.
- Select One line to remove the line breaks and indentation again.
Good to know
- Short calls stay together: a call without other functions in it, such as
replace('a', '/', '-'), stays on one line inside another call (the outermost call is always split), and references such asvariables('a')and a function of one constant such asstring('a')count as values. - Cmd+Shift+F (Mac) or Ctrl+Shift+F (Windows) in the editor does the same as a toggle: one line becomes formatted, and a formatted expression becomes one line.
- Cmd/Ctrl+Z brings back the text from before.
- Only white space outside text between single quotes changes, so the expression means the same. OK and Update put the expression back on one line first, so the flow always gets it as usual.
- The buttons and the shortcut need the Large expression editor: the small editor has room for one line only.
Indent on Enter
Enter in the large editor works as in a code editor. The new line keeps the
indentation of the line you are on, and right after an opening bracket it is indented one step
more. Between a pair of brackets, such as replace(|), the closing bracket goes to a
line of its own, with the cursor on an indented line in between.
- After
'test',inside the brackets, Enter gives a new line at the same indentation, for the next parameter. - With the list of suggestions open, Enter picks the suggestion.
- Between single quotes, Enter adds a line break to the text itself, for the rare expression that needs one. It stays when you select OK.
Switches in the settings window: Format expression and Indent on Enter
Writing expressions
Function brackets
Pick a function from the suggestions and its brackets come with it, with the cursor between
them: conc and Tab gives concat(|).
- It works with Tab, Enter or a click on the suggestion, and shows the parameters of the function.
- When a bracket already follows the name, the cursor only moves past it.
true,falseandnullget no brackets.- Cmd/Ctrl+Z removes the name and the brackets in one step.
Switch in the settings window: Function brackets
Writing expressions
Copy dynamic content and expressions
Point at dynamic content or an expression in a field and a small bar appears over it:
Copy puts it on the clipboard as its expression, such as
@{outputs('Compose')}, and Cut also removes it from the field.
Paste it into another field and it is a token again; paste it into the Expression tab and the
@{} is left out.
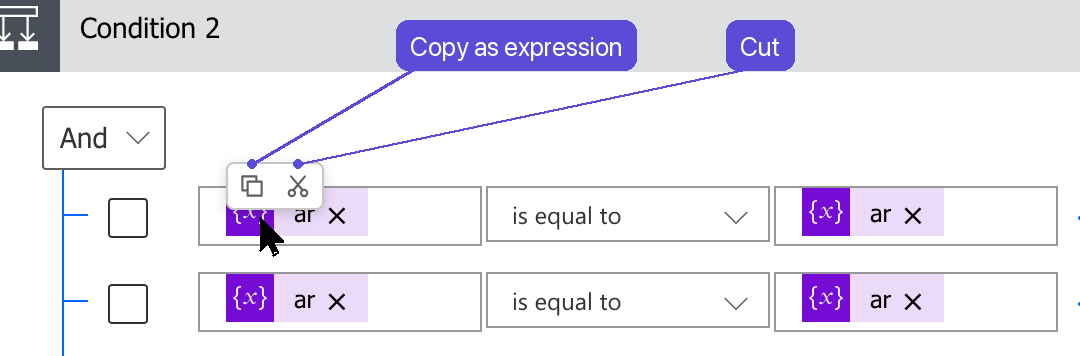
- It works in the fields of every action and in the rules of a Condition, Filter array or Do until.
- Cut removes the token the same way as its ×, so Undo in the command bar brings it back.
- In the expression editor,
@{outputs('Compose')}and@outputs('Compose')are pasted asoutputs('Compose'). Text with more than one@{...}, such asHi @{a} and @{b}, is pasted as it is. - The expressions of the Conditions panel of a run and of the Full expressions lines have Copy too.
- In the field of an action, the designer itself copies tokens with the keyboard too: click dynamic content, or select part of the field, and press Cmd/Ctrl+C or Cmd/Ctrl+X. A click on an expression opens it in the expression editor instead, which is where the bar helps.
Switch in the settings window: Copy dynamic content and expressions
Writing expressions
Move or center the popup
Drag the dynamic content and expression popup by the purple handle at the top, so it does not cover the part of the flow you need.
- The popup stays inside the window. The next time it opens, it is back in its normal place.
- Double-click the handle to put it back right away.
- With Center expression popup on, the popup opens in the middle of the window and stays there when its size changes, such as when you switch tabs or drag a grip. Once you drag it, it stays where you drop it.
The handle has no switch. Centering: Center expression popup in the settings window, off by default.
Writing expressions
Confirm with the keyboard
Press Cmd+Enter (Mac) or Ctrl+Enter (Windows) in the expression editor or its search box to press OK or Update. Without the extension, the key adds a new line to the expression.
No switch: always on in the classic designer.
Finding your way in a flow
Action search
Find any action in a large flow, also inside collapsed loops, conditions and switches, and also by what is inside it, such as a site address, a list name or an expression.
How to use it
- Select Search in the command bar, next to Flow checker, or press Alt+Shift+F.
- Type a word. The list shows every action whose name, type or parameters contain it.
- Click a result, or use the arrow keys and Enter. The designer opens the blocks around it and scrolls it into view.
More in the panel
- Names or Parameters narrows where it searches; Aa matches upper and lower case.
- Find usages lists the actions that use an action's output. For a variable (on Initialize variable, Set variable and the like) it lists the actions that set it and the ones that read it, each with a sets or reads tag. A click on a result of Find usages opens it and outlines every field that uses the action or variable in red for a moment.
- Copy as JSON puts an action on My clipboard, to paste from the + on an arrow, and copies it as JSON for after a page reload or another browser: paste that with Cmd+V in My clipboard of Add an action.
- Outline (the button with the lines at the top of the panel, or Alt+O) shows the flow as a tree with the actions of each block, branch and case indented below it. The arrow before a block folds it, in the panel only, also while searching; a new search starts unfolded. Opening a card on the canvas selects it in the panel too, also when the panel opens afterwards. Press Alt+O again to go back to the list.
- Replace changes typed text in all actions at once, with its own Undo.
- The box before each action selects it, to delete or move several actions at once.
- In a flow run, Failed and Skipped list only those actions.
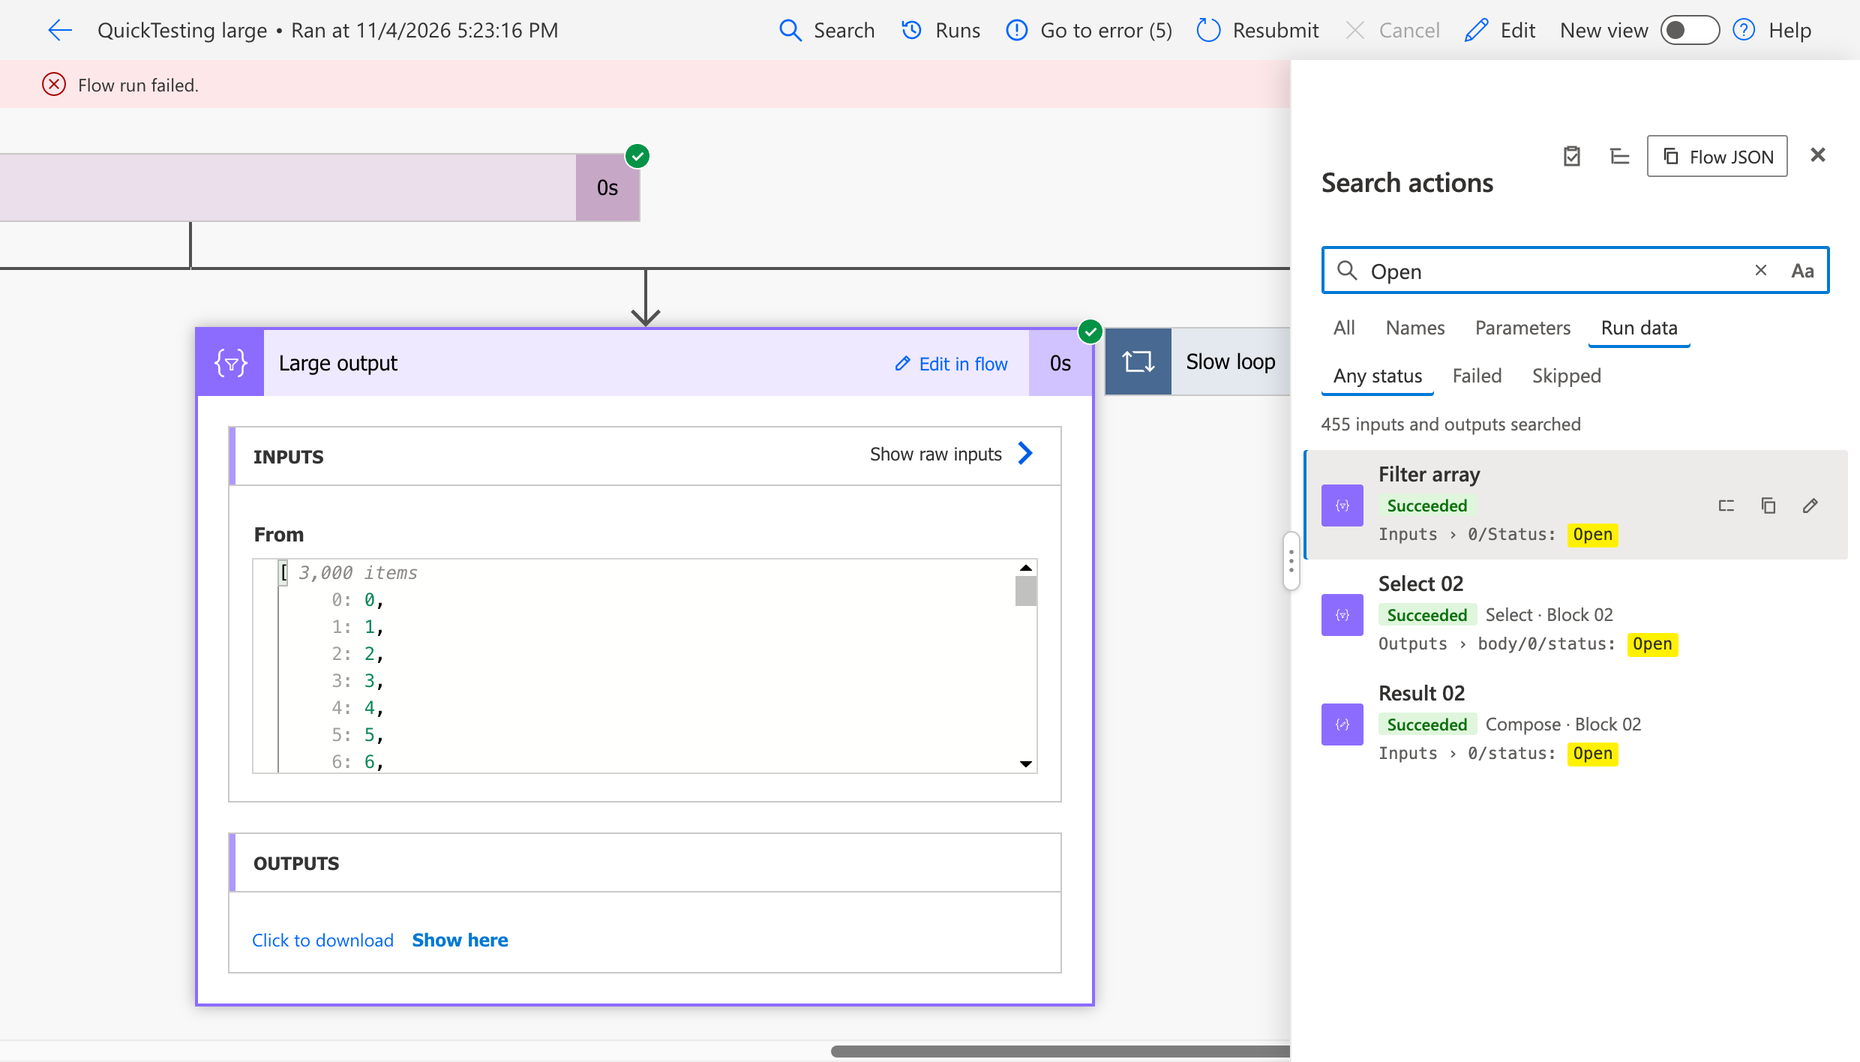
- In a flow run, Run data (or Alt+I) searches the inputs and outputs of the trigger and every action, also every iteration of a loop: find the action that got an order number or an email address. Select Read run data first: it reads every input and output, which takes a few seconds, longer in a large run. The result shows where the value is, such as
Iteration 18 · Outputs › body/Title, and choosing it switches the loop to that iteration. Secured inputs and outputs, and those over 1 MB, are not searched. - Failed in the list is an overview of the errors: one row per stop of Go to error, also per failed iteration of a loop, with the error message below it. Choosing a row switches the loop to that iteration and opens the failed action.
Switch in the settings window: Action search
Finding your way in a flow
Review flow
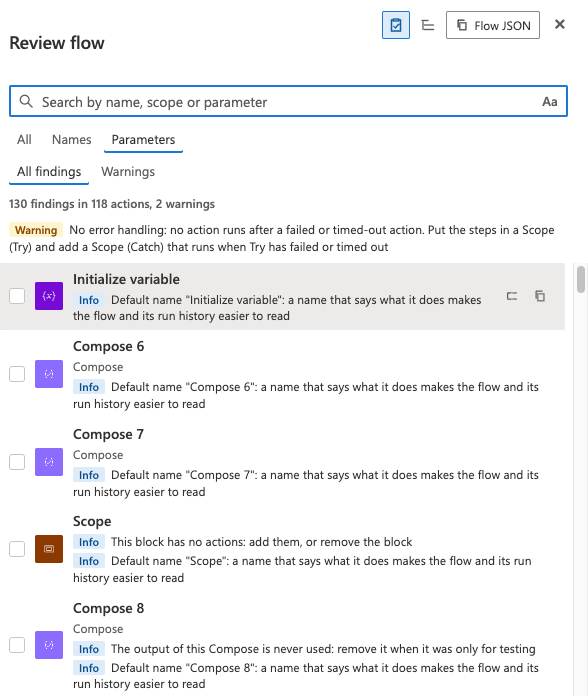
Check a flow for common mistakes that Flow checker does not report, such as no error handling, secrets in the run history or unused variables, and go to each one. The findings show in the Search panel and in Flow checker.
How to use it
- Open a flow in the classic designer and select Search in the command bar.
- Select Review at the top of the panel, the clipboard with a check (Alt+V).
- The panel lists each action with what was found, in the order of the flow. Select one, or use the arrow keys and Enter, to open and outline that action.
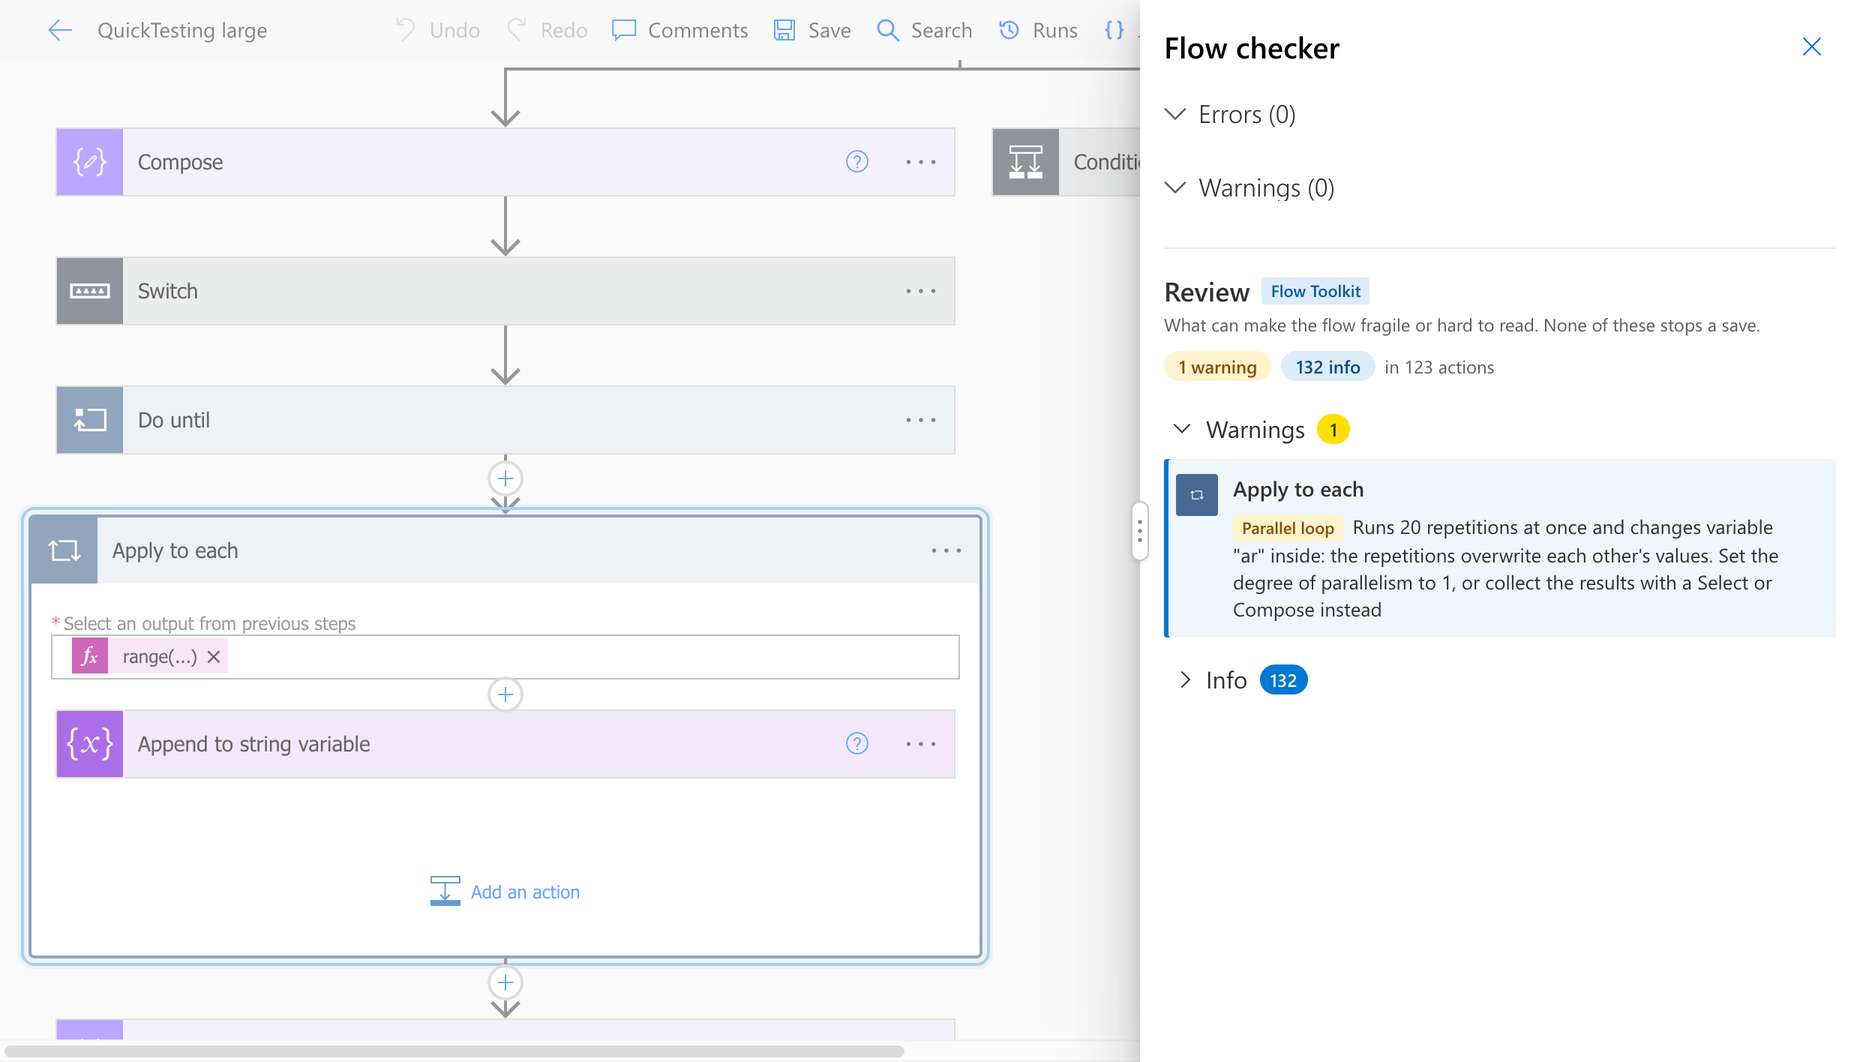
The same findings are also in Flow checker, below Microsoft's own Errors and Warnings: Warnings, and Info folded, each action with its icon and a tag per finding. Select an action there to open its card next to Flow checker, outlined in light blue. Drag the grip on the left edge of Flow checker to make it wider.
What it checks
- Warning: no action runs after a failed or timed-out action anywhere (no Try and Catch); an HTTP action that sends a secret, or a Key Vault secret, without Secure inputs or Secure outputs; an Apply to each that runs in parallel and changes a variable inside; a SharePoint Get items without a Filter Query or Top Count.
- Info: a variable that is never read; a Compose whose output is never used; a block without actions; a SharePoint site address typed in instead of an environment variable; a default name such as Compose 3; a Get items that stops at 100 items without Pagination.
Good to know
- Findings about the whole flow, such as no error handling, stand above the list.
- Warnings below the search box (Alt+W) hides the info findings, such as default names; All findings shows them again.
- The list follows your edits: solve a finding and it disappears. Nothing is changed or saved by the review itself.
- Typing in the search box narrows the findings to matching actions. Review again, or Outline, goes back to the search.
Switch in the settings window: Review flow
Finding your way in a flow
Moving around the canvas
Three small helps for a large flow. They work in the classic designer, while editing and in a flow run.
Collapse all cards
Alt+Shift+C (Option+Shift+C on a Mac) collapses every open card of the flow, also inside loops, conditions and scopes, as if you clicked each title.
Keep your place
When you open or close a card, the card you clicked stays where it is on the screen, instead of the view jumping.
It also keeps the place sideways, when a Condition or Switch changes the width of the flow. Near the end of a flow, where there is nothing left to scroll, the extension adds empty space below the flow until you scroll up. Scrolling, a key or another click ends it. This works in a flow run too.
Pan the canvas
Press the middle mouse button (the wheel) on the canvas and drag: the flow moves with the pointer, in both directions. This works while editing and in a flow run.
- The pointer shows a grabbing hand while you drag, and the browser's own autoscroll is off. It does not start in editors, fields, popups or the action search panel. A middle click without moving, for example on a link, works as before.
- With Pan with left button on, the left button does the same on an empty part of the canvas, as in the new designer. That includes the empty space inside an open Scope, loop, Condition or Switch. On a card, a button or a field it works as before.
- A pan goes on for half the window past the edge of the flow, so an action at the edge can move to the middle. Scroll back as usual; the extra room goes away by itself.
Collapse all cards, Keep your place and panning with the middle button have no switch. The left button: Pan with left button in the settings window, off by default.
Debugging a run
Go to error
In a flow run, jump straight to the action that failed, also when it is inside a collapsed scope or loop.
How to use it
- Open a flow run that has a failed action, in the classic designer.
- Select Go to error in the command bar, before Resubmit.
- The designer opens the blocks around the failed action and opens it, so its error shows. It is centered and outlined in red for a moment.
Good to know
- A scope or loop around a failed action shows Failed too. The button skips those and goes to the action that failed itself.
- The button shows how many failed actions there are, such as Go to error (5), and after a click where you are: Go to error 2/5. Each next click goes to the next one, and then back to the first.
- The failed actions inside loop iterations are counted too, before you go there. Only in a very large run can the number still grow after a visit; the tooltip then says so.
- A loop shows one iteration at a time. For a failed Apply to each or Do until, the button switches the loop to the iteration that failed, also in nested loops, and the tooltip names it: "Failed in iteration 157 of 300". Each failed iteration is a stop of its own.
Switch in the settings window: Go to error
Debugging a run
Edit action from a run
From a flow run straight to that action in the flow editor, opened and in view.
How to use it
- Open a flow run in the classic designer and open an action, for example the one that failed.
- Select Edit in flow in the header of the open card, next to the duration.
- The flow editor opens with that action opened, centered and outlined in red for a moment.
Good to know
- Cmd+click (macOS) or Ctrl+click, or a middle click, opens the editor in a new tab, so the run stays open.
- In the Search panel of a run, each result has an Edit action button (Alt+E for the selected result), also for an action whose card is closed.
- The editor shows the current version of the flow. When the action was renamed or deleted since the run, a message at the bottom of the page says so.
Switch in the settings window: Edit action from a run
Debugging a run
Condition rules in a run
In a flow run, a Condition only says true or false. See which of its rules made it so, with the value of each side in the run.
How to use it
- Open a flow run in the classic designer and open a Condition.
- Select Show conditions in the header of its inputs, next to Show raw inputs.
- Each rule shows on one line, as in the Condition editor: True, False or Unknown, then each side with
= value, its value in the run. Hover a field for the whole expression and value.
Good to know
- Power Automate keeps only the overall result, so the rules are worked out again from the run: the outputs of actions and the trigger, the item of an Apply to each, and variables that only Initialize variable and Set variable change, outside loops.
- Unknown comes with its reason, such as
utcNow(), a function that is not supported, or two texts that differ only in upper and lower case. A dashed outline means the outcome is the only one that fits the Condition's real result. - If the worked-out result differs from the real one, the panel says so. The real Expression result always counts.
- Nothing is loaded until you select Show conditions.
- A Filter array has Show conditions in its inputs too. Its rules use
item(), so the panel shows one item of From at a time: go through them with ‹ and › or type a number. Each item says Kept or Dropped, as in the run's output. - All items next to the item number opens a panel on the right with every item of From in one list: Kept or Dropped, a few key fields (first, in bold, the fields the conditions use), and under a dropped item why, in words, such as Age is 12, not greater than 18. Show only kept or dropped items, search their content, open an item's JSON, or select a row to see that item's rules in the card. Esc closes it.
- A Do until has a Conditions bar at the top of its loop. The panel follows the loop's pager: the loop goes on while its condition is false, so each iteration before the last was false and the last one true.
Switch in the settings window: Condition rules in a run
Debugging a run
Open a child flow
Go from a Run a Child Flow action straight to the child flow, in a run to the run of the child flow it started (also every earlier attempt of a retried action), and from a child run back to the parent run.
How to use it
- A Run a Child Flow action has an arrow after its name. Click it to open the child flow in a new tab; your flow stays open as it is.
- In a flow run, Child run in the header of the action, next to Edit in flow, opens the run of the child flow that this action started. In a loop, it is the run of the iteration the loop shows.
- When the action was retried, 3 runs (or the count) next to Child run lists every run of the child flow it started, with the start time, how long it took and its status. Click a run to open it.
- In the run of a child flow, Parent run on the trigger opens the run of the flow that called it, with the calling action open, in a loop at the iteration that made the call.
Good to know
- A run only shows the last attempt of a retried action. The list finds the earlier ones, such as a first attempt that took four minutes before it failed. Only the runs of that one call are listed, not those of other loop iterations.
- The status in the list is that of the child run: a child flow that answered with an error still succeeded.
- Child flows with an HTTP trigger work the same way. A flow called by an HTTP action of another flow gets Parent run too.
- A skipped action has no child run: Child flow opens the child flow instead.
- Nothing is loaded for Child run until you point at it or open the action.
Switch in the settings window: Open a child flow
Debugging a run
Fold JSON in a run
Fold objects and arrays in the inputs and outputs of a run, so a large JSON shows its outline first.
How to use it
- Open a flow run in the classic designer and open an action, or click Show raw inputs or Show raw outputs.
- Each object and array has an arrow before it. Click one to fold that object or array; a folded array keeps its count, such as
"Channel Owners": [ 7 items …, and a folded object shows its number of keys. - In the raw panel, Fold all folds everything inside the outer object or array, so its keys still show; Unfold all opens everything again.
Good to know
- The JSON always opens unfolded.
- Each item of an array shows its index (
0:,1:, …), also in the inputs and outputs window, so you can find item 1,234 of a long array. Turn it off with Index before array items, under Fold JSON in a run. - Under Fold JSON in a run, Fold arrows off hides the arrows (the raw panel keeps Fold all and Unfold all), and Arrows in the left margin puts them in the margin on the left of the JSON instead of before each key.
- Folding changes only the view; copying copies the whole JSON.
Switch in the settings window: Fold JSON in a run
Debugging a run
Array sizes in a run
In a flow run, see at a glance how many items an array in the inputs or outputs of an action has.
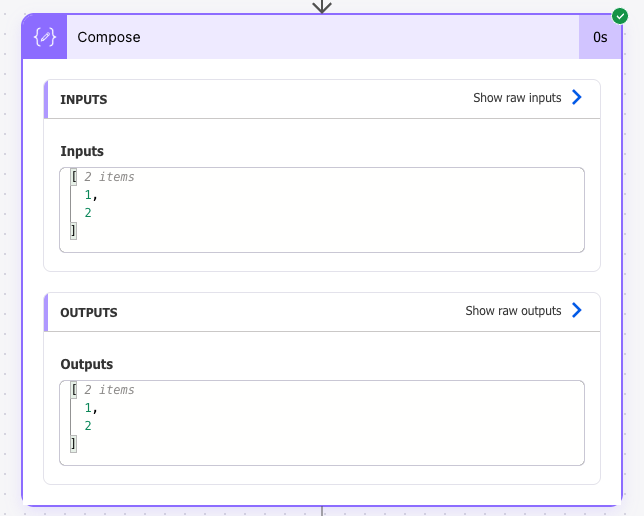
How to use it
- Open a flow run in the classic designer and open an action, such as a Compose, Filter array, Select or HTTP.
- Each array in its inputs and outputs shows its number of items in gray after the
[, such as[ 25 items. Arrays deeper in the JSON have one too, such asvaluein the body of an HTTP call. - Show raw inputs and Show raw outputs show the counts as well.
Good to know
- An empty array
[]gets no count. - The counts are not part of the text: copying the JSON copies it without them.
- Only the JSON on the page is read; nothing extra is loaded.
Switch in the settings window: Array sizes in a run
Debugging a run
Inputs and outputs in a window
Put the inputs and outputs of a run action in a window of their own, for instance on a second screen, and keep exploring the flow.
How to use it
- Open a flow run in the classic designer and open an action.
- Click Show raw inputs or Show raw outputs, then Open in window at the top of the panel. A window opens with the action's Inputs and Outputs as a JSON tree that folds.
- The window follows the run: click another action, or page through a loop, and it shows that action or repetition.
- Click Pin to keep the window on its action. The next Open in window opens a new window that follows, so you can put several actions side by side.
Good to know
- The window opens where you last left it. Copy copies the JSON of the open tab; Cmd/Ctrl+F also finds text in folded parts and opens them.
- The extension reads the inputs and outputs as the designer does, from the run; nothing goes anywhere else.
- Secured inputs and outputs are not shown.
Switch in the settings window: Inputs and outputs in a window
Debugging a run
Large inputs and outputs in a panel
Read inputs and outputs over 256 KB in the run itself, instead of downloading them.
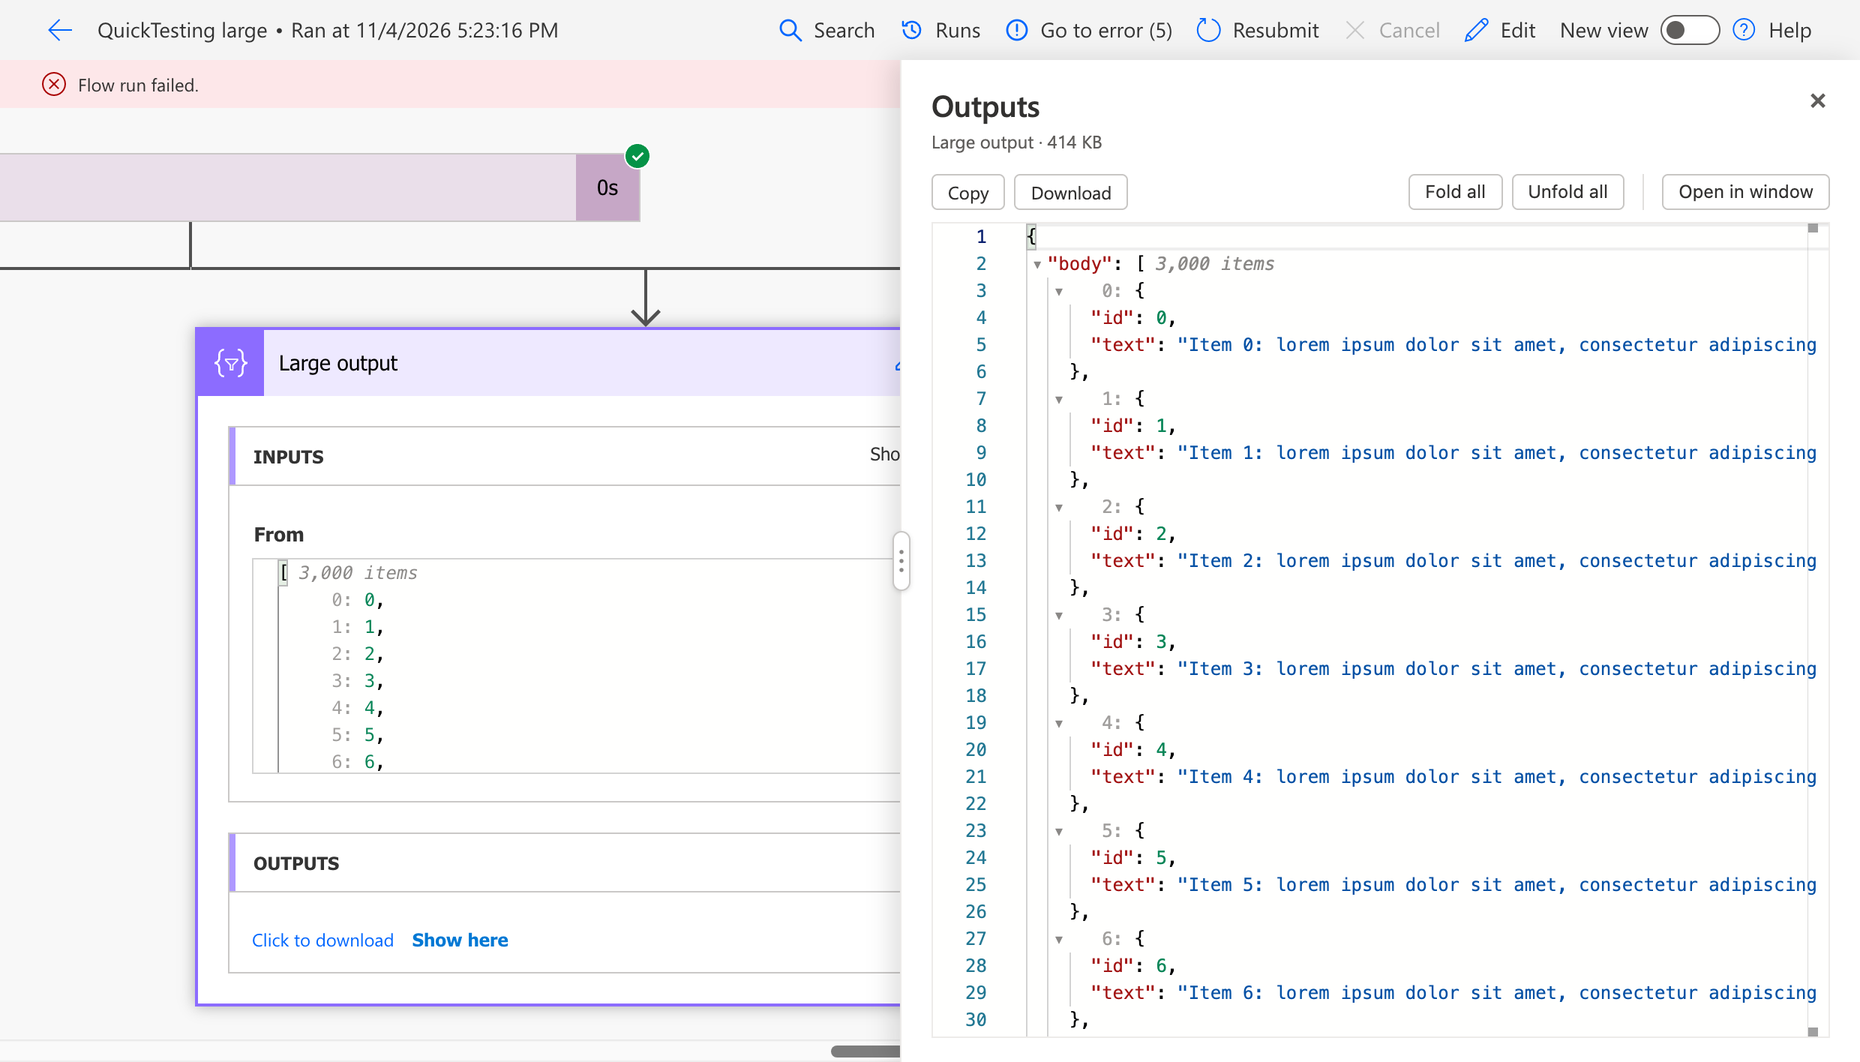
How to use it
- Open a flow run in the classic designer and open an action whose inputs or outputs say Click to download.
- Click Show here next to it. A panel on the right shows the content, JSON indented, with the array counts, the fold arrows and Fold all.
- Cmd/Ctrl+F searches in it; Copy copies the text and Download still downloads it. Open in window opens the action in a window of its own, as from the raw panel, with Pin. Esc or × closes the panel.
Good to know
- The designer itself stops showing inputs and outputs at 256 KB; the panel shows them up to 50 MB.
- A file that is not text, such as a PDF or an image, shows its type and size; use Download for it.
- Drag the left edge of the panel to make it wider; the width is remembered.
Switch in the settings window: Large inputs and outputs in a panel
Debugging a run
Loops while the run runs
See how far an Apply to each has got while the run is still running, iteration by iteration.
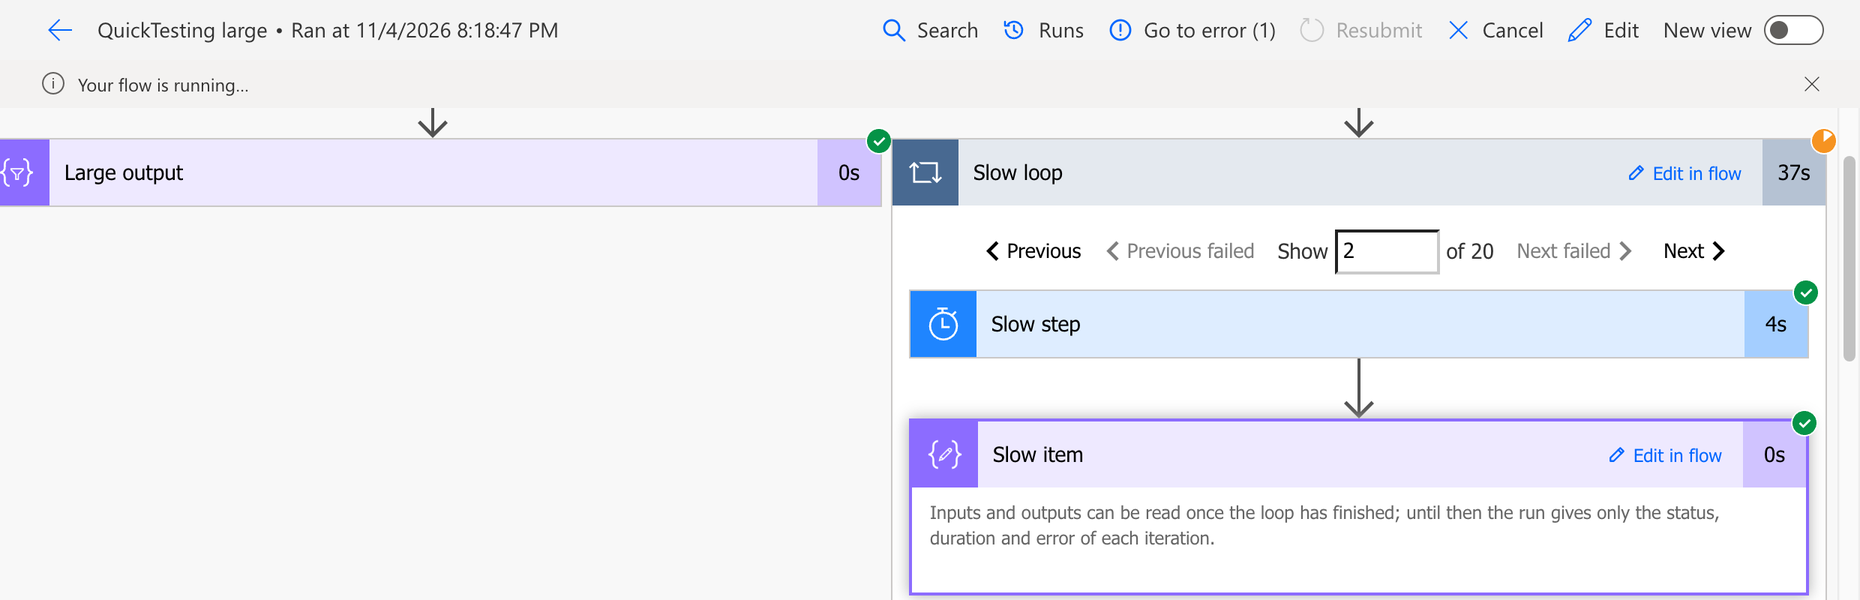
How to use it
- Open a run that is still running (Your flow is running…) and open its Apply to each.
- The first iteration shows by itself: the actions in it get their status and duration instead of staying grey.
- Use the loop's own pager, Previous, Next or the number, to look at another iteration that has finished. The iteration that runs turns green when it is done.
Good to know
- Power Automate only gives the status, duration and error of each iteration while the loop runs. The inputs and outputs can be read once the loop has finished; until then the card says so.
- An iteration that has not run yet stays grey.
- A Do until that still runs is not covered.
Switch in the settings window: Loops while the run runs
Debugging a run
Resize the raw panel
Make the panel of Show raw inputs and Show raw outputs in a flow run wider, so long JSON fits.
How to use it
- Open a flow run in the classic designer, open an action and select Show raw inputs or Show raw outputs.
- Drag the grip on the left edge of the panel to the left or right, the same as the edge of the Search panel.
- Double-click the grip to go back to the designer's width. With the grip focused, the arrow keys change the width too.
Good to know
- The next panel opens at the designer's width again, unless Remember panel width is on: then it opens at the width you last dragged it to.
- The remembered width is kept in this browser profile and is not synced.
Switch in the settings window: Remember panel width
Run history and flow lists
Filter runs
See all runs of a flow in one list, filter and search them, also in what the trigger received, and resubmit or cancel several at once.
How to use it
- Open the run history of a flow (All runs on the flow's page) and select Filter runs at the right of Run history. On the flow's details page, Filter runs is in the title of the 28-day run history card, before Edit columns.
- Choose a Status, Started after and Started before, and how many runs to load, then Load runs. The first 1,000 runs load when the panel opens.
- Click a column header to sort on it, or to filter it: choose a condition, such as contains, equals, is after or is longer than, and type a value. Status has check boxes instead, such as Failed and Running, with the number of runs of each. Active filters show above the table; × removes one. Next to each start time is how long ago the run started, such as (3 min ago) or (5 d ago), as in Power Automate's own run lists.
- Drag a column header to move the column, and the edge of a header to change its width; a double-click on the edge fits the column to its content. The order and widths are remembered per flow; Reset layout in Columns puts them back and keeps the columns you chose, Reset all also goes back to the standard columns. The search box above the table searches every column.
- Select Columns to add fields of the trigger outputs as columns, such as
IDorDocIDof a SharePoint item; their values load by themselves. The properties of an object, also of one passed on as text such asparameters, are listed indented under it, each as a column of its own; the arrow at the right of the object collapses or expands them. Duration, Status and Error can be hidden there too. - Select Load trigger content to search in the trigger inputs and outputs too.
- Tick runs and select Resubmit, or Cancel runs for runs that are still running. The panel asks first. Export CSV saves the rows you see.
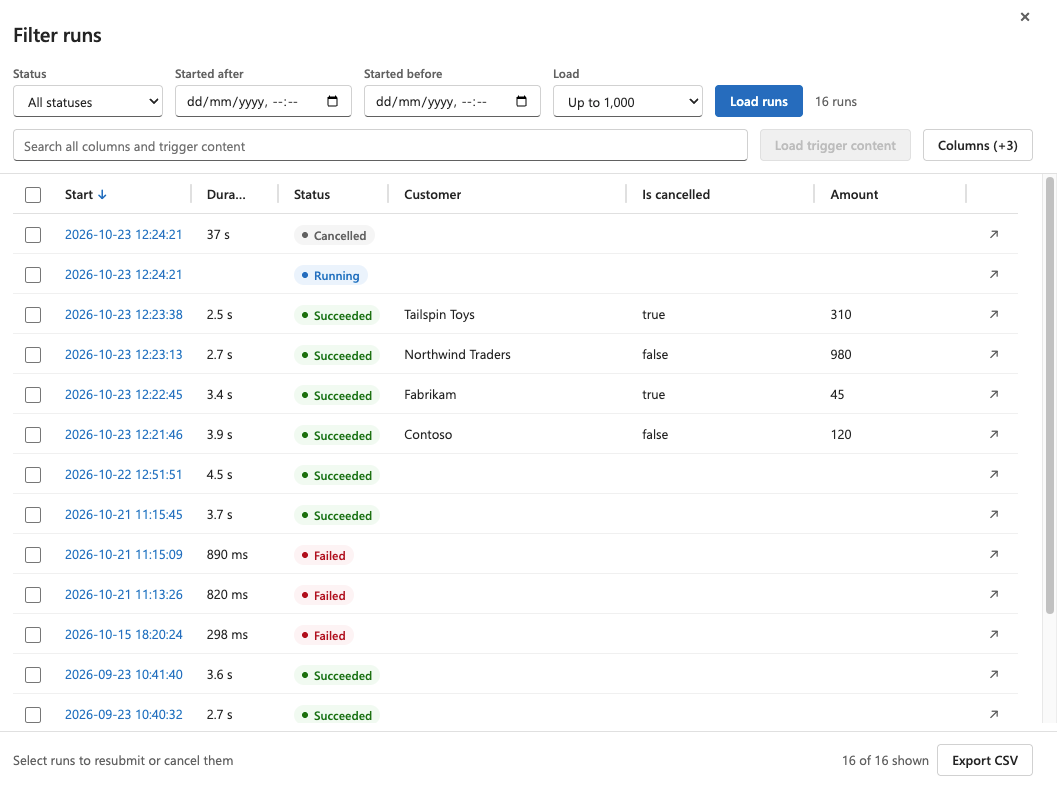
In the designer
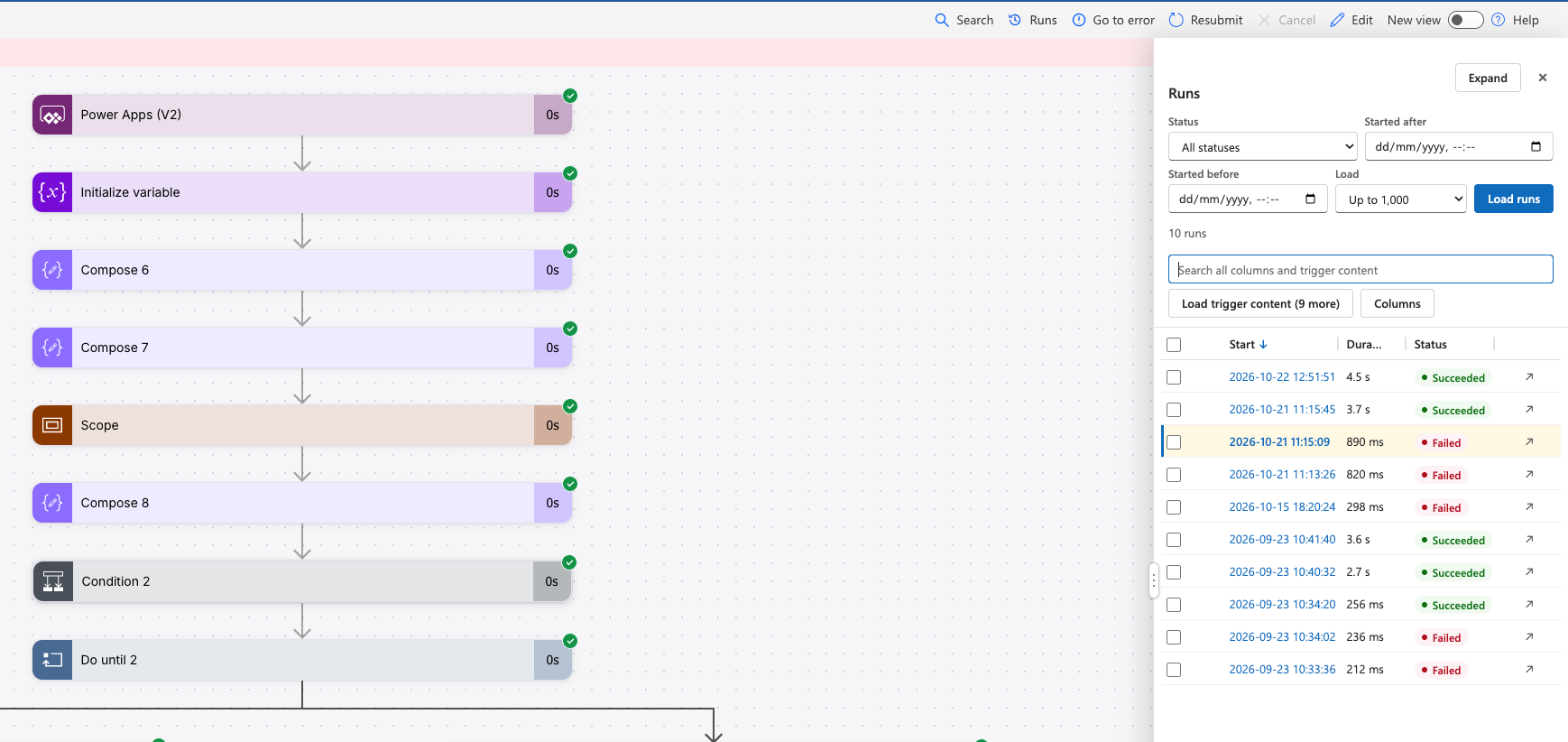
- In the classic designer, while you edit the flow or look at a run, select Runs in the command bar, after Search.
- The runs show next to the canvas, with the run you are looking at marked. Hover a status for the error of a failed run.
- Click a run to open it. The list opens again with the same filters, so you can go from run to run. Expand shows the whole table, Dock puts it back next to the canvas.
Good to know
- Status and dates are filtered by Power Automate itself, so a flow with many runs loads only what you ask for. Every other filter works on the runs that are loaded.
- Words in a search all have to be found; put a phrase in quotes, such as
"not found". Upper and lower case do not matter. - Loading the trigger content takes one request per run, so it only happens when you select it. Runs with secured inputs and outputs show a
–. - Resubmit starts each run again with the same trigger input, so its actions run again too, such as sending mail.
- The columns you choose are remembered per flow in this browser. Inputs of a manual or Power Apps trigger show with the names you gave them.
- Drag the left edge of the panel to make it wider or narrower; a double-click gives the default width.
- Opening a run from the designer leaves the edit view; save your changes first.
Switch in the settings window: Filter runs
Run history and flow lists
Filter flows
See every flow of your list in one table, without Show more, and filter, sort and search it on any column.
How to use it
- Open My flows and select Filter flows at the right of the tabs Cloud flows … Shared with me. It works on both tabs.
- All flows of the tab load at once, 50 at a time, as Power Automate loads them; the count shows above the table. Stop stops it, Load the rest goes on, Load again starts over.
- The table shows Name, Modified, Created, Status (On, Off or Suspended), Type (Instant, Automated or Scheduled), Trigger, the Connectors the flow uses, Solution (whether it is in a solution, and managed) and Premium (whether the flow needs a premium license, as the diamond after its name says).
- Click a column header to sort on it or to filter it. Status, Type, Trigger, Connectors, Solution and Premium have check boxes with the number of flows of each, such as all flows that use SharePoint, all that are off, or all premium flows. Name and the dates have a condition, such as contains or is after, and a value. Active filters show above the table; × removes one.
- The search box searches every column. Click a name to open the flow, ↗ opens it in a new tab.
- Columns hides or shows columns; drag the edge of a header to make a column wider. Export CSV saves the rows you see.
Good to know
- The flows are loaded with your own sign-in, the same way the page loads them; nothing is changed.
- Words in a search all have to be found; put a phrase in quotes. Upper and lower case do not matter.
- Hidden columns, column widths and the width of the panel are remembered in this browser.
- The flows of a solution are listed on a page of Power Apps, where this panel is not.
Switch in the settings window: Filter flows
Run history and flow lists
Resizable flow columns
Make the columns of the flows list wider, so long flow names are no longer cut off.
How to use it
- Open My flows (Cloud flows or Shared with me).
- Point at the right edge of a column header, such as Name: a thin line shows. Drag it to make the column wider or narrower.
- Double-click the line to give the column its usual width again.
Good to know
- The widths are remembered in this browser, for both tabs and every environment.
- When the columns are wider than the page, the list scrolls sideways.
Switch in the settings window: Resizable flow columns
Editing a flow
Quick rename, note and copy
Rename an action, edit its note or copy it in one click, instead of through the card menu.
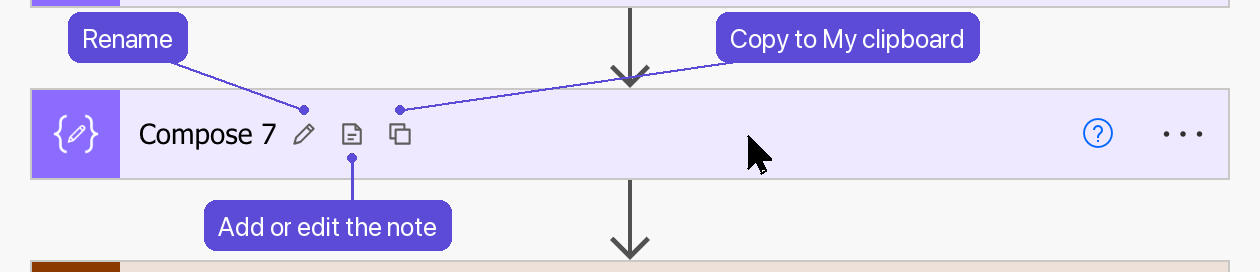
How to use it
- Point at a card: a pencil, a note, a copy button and a bookmark appear after its name. The bookmark keeps the action in My actions. Soon in 4.0
- Select the pencil, type the new name and press Enter. Escape keeps the old name.
- Select the note button to add a note, or to edit the note the action already has.
- Select the copy button to put the action on My clipboard. It shows a check for a moment. Then paste it from the + on an arrow.
Good to know
- The buttons do what Rename, Add a note and Copy to my clipboard in the card menu do.
- Renaming and copying do not expand or collapse the card. A note is shown inside the card, so the note button expands it.
- The trigger has no pencil and no copy button, and a flow run has none of the buttons, because the designer cannot rename or copy there either.
- My clipboard is the designer's own list. It is shared by the flows open in other tabs, and it is empty again after a page reload.
Switch in the settings window: Quick rename, note and copy
Editing a flow
Paste an action
Paste a copied action straight from the + on an arrow, instead of through Add an action, the My clipboard tab and a click on the action.
How to use it
- Copy an action: the copy button after its name, Copy to my clipboard in its card menu, or Copy as JSON in the action search.
- Point at the arrow where it should go and select the +.
- Select Paste with the name of the action. With more than one action on My clipboard, Paste an action lists them, the last one copied at the bottom.
A short list
- My clipboard keeps the five actions copied last. A sixth copy removes the oldest, and copying an action again replaces its older copy. This also applies to the My clipboard tab of Add an action.
- Clear My clipboard at the bottom of the list empties it, also in the other tabs with a flow open. A page reload empties it too.
Good to know
- The extension takes the designer's own steps, so the result is the same as with the My clipboard tab: an action with a name that is already used gets a number, such as
Compose_2, and a pasted Scope or loop brings the actions inside it. - Undo in the designer removes the pasted action.
- The + above the first action in a loop or other block (Insert before the first action) offers Paste too.
- A copied trigger cannot be pasted as an action and is not listed.
- After a page reload, or in another browser, My clipboard is empty. An action copied with Copy as JSON in the action search is still on the system clipboard: paste it with Cmd+V (Ctrl+V) in the My clipboard tab of Add an action there.
- When the designer cannot paste the action, for example because its connections are of another kind, the My clipboard tab stays open and shows why.
Switch in the settings window: Paste an action
Editing a flow
My actions Soon in 4.0
Keep the actions you use often and insert them in any flow. Unlike My clipboard, they stay after a reload.
How to use it
- Hover over a card and select the bookmark next to its name, or choose Save to My actions in its … menu. A Scope, loop or Condition keeps everything inside it.
- Point at the arrow where an action should go, select the + and choose My actions.
- Search, and select an action or press Enter. It lands at that arrow.
Keeping the list tidy
- The pencil on a row renames the action and the bin deletes it, with Undo in the message at the bottom.
- What you used last is on top, until you drag an action to another place (or use Alt+↑ and Alt+↓): from then the list keeps your order, and a new action comes first. Sort by last used goes back.
- A Scope, loop or Condition says how many actions are inside it. The arrow on its row shows them, in the order they run, with the Yes and No branches; → and ← do the same. The search also finds it by an action inside it.
- Export saves the list as a file; Import adds the actions of such a file, for another computer or a colleague.
Good to know
- Saving the same action again adds nothing. Another action with a name you already have gets a number, and the message offers to replace the old one.
- Inserting works like paste: an action with a name that is already used gets a number, Undo removes it, and an action with a connection asks for one when this environment has none.
- A saved action holds its values as they are, also a key in an HTTP action, unencrypted in this Chrome profile and in an export. The extension warns when an action may hold a secret, but it can't recognize every secret, so check an export before you share it.
- A trigger can't be saved, because it can only replace a trigger.
- Too many buttons on a card? Under My actions in the settings, Bookmark on the card and Save in the … menu each turn one of the two off. The bookmark is one of the quick buttons, so it also needs that switch.
Where your actions are kept
My actions belongs to your Chrome profile on this computer, not to an account. Nothing is sent anywhere.
| When you | Your actions |
|---|---|
| Open another flow or environment, or sign in with another Microsoft account in the same Chrome profile | Are all there |
| Use another computer, also with the same Google account | Are not there: unlike your settings, they don't sync |
| Use another Chrome profile | Are not there: each profile has its own list |
| Clear the site data of Power Automate, or update the extension | Stay |
| Uninstall the extension | Are gone |
- Export is your backup, and the way to bring your actions to another computer or profile: Import adds them there.
- Chrome gives the extension 10 MB for this list. That is room for thousands of ordinary actions; a Scope with many actions in it takes more. When the list is full, saving gives a message, and deleting actions you no longer use makes room.
- They don't sync because Chrome allows only 8 kB per item in the storage that follows your Google account, too little for a Scope with actions in it.
Switch in the settings window: My actions
Editing a flow
Select several actions
Delete or move several actions at once, instead of one by one.
How to select
- On the canvas, Cmd+click (Ctrl+click on Windows) the header of a card. It gets a blue outline. Click it again the same way to take it out.
- In the Action search panel, tick the box before an action, also one inside a collapsed block. Cmd/Ctrl+click on a row does the same, Shift+click selects the rows in between, Alt+S the selected row and Alt+A every result of the search.
- The canvas and the panel share the selection. A bar at the bottom of the canvas counts it; Clear or Escape empties it.
Delete
- Select Delete in the bar.
- The bar asks first. It says how many actions inside the selected blocks go too, and which other actions use the ones you delete.
- Select Delete again. Undo in the bar, or in the command bar, brings them all back at once, until you save.
Move
- Select two or more actions.
- Drag one of them to an arrow, into an empty branch, or to the + above the first action of a block, as you would drag one card. The other selected cards fade while you drag.
- All selected actions go there, after each other, in the order they had in the flow. With 1 to 5 in a row and 1, 3 and 5 dragged to the arrow below 2, the flow becomes 2, 1, 3, 5, 4.
Good to know
- A block goes with everything in it. A selected action inside a selected block is not moved or deleted on its own.
- The designer's Undo does not take back a move, not even of one card. Move back in the bar puts the actions back where they were.
- If the designer refuses a place, for example above the action whose output one of them uses, nothing is moved and the bar says why.
- The trigger, a Switch case and a flow run cannot be selected.
Switch in the settings window: Select several actions
Editing a flow
Insert before the first action
The classic designer cannot add a step before the first action inside an Apply to each, Do until, Scope, Condition branch or Switch case. The extension adds a "+" there.
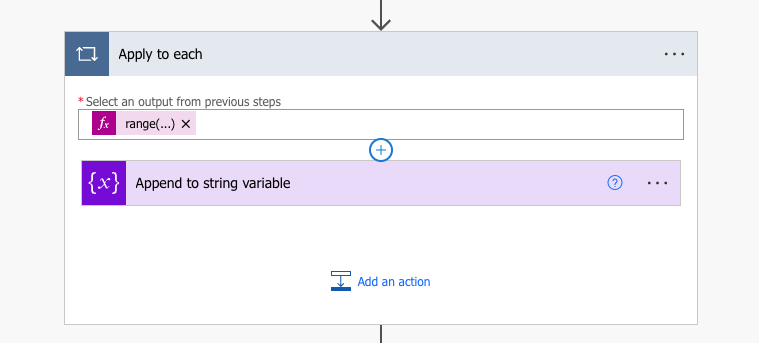
How to use it
- Select the "+" above the first action, and then Add an action.
- Choose an operation as usual. The new step becomes the first action; the old first action runs after it.
Good to know
- You can also drag an existing card onto the "+". It turns blue where the card may go, and red, with the reason, where it may not.
- Undo removes an added step. A moved card does not undo; drag it back instead.
Switch in the settings window: Insert before first action
Editing a flow
Multiple conditions
A Filter array and a Do until take one condition in basic mode. More than one needs an expression in advanced mode. The extension puts the Condition action's own editor in the card, with rows and groups with And or Or, and writes that expression for you.
How to use it
- Expand a Filter array or Do until and select Edit with multiple conditions under its condition.
- Fill in each row as in a Condition: a value, a comparison such as is equal to or contains, and a second value. Dynamic content and Expression work as in any field.
- + Add adds a row or a group. The … menu of a row or group has Move up, Move down, grouping and Delete.
Good to know
- Each change writes an expression such as
@and(equals(item()?['Status'], 'Open'), greater(item()?['Age'], 18))in advanced mode, so the flow works without the extension. - A filter or loop that already has more than one condition opens with its rows. With one condition the card looks as usual; Hide multiple conditions goes back to it. Undo and edits in the expression box show in the rows.
- A value such as
item()shows as an fx expression; select it to edit it. - Select the expression box itself to edit the whole expression in the Expression popup, without its
@. OK writes it back with the@. You can still type in the box. - Delete the whole expression and select Update (or leave the box empty): the card goes back to basic mode with one empty row, so you can save without an error.
- The card gets wider for groups inside groups. The expression box above grows with the expression; drag its lower right corner to make it higher.
- A function that is not a comparison, such as
empty(item()?['Status']), is a row is equal totrue, as in a Condition, and staysempty(...)in the expression. - An expression that is not one condition, such as text with
@{...}, cannot be shown as rows. Start over replaces it with one empty row. The extension never replaces it on its own. - Edit in basic mode only works with one condition, because basic mode has one row.
Switch in the settings window: Multiple conditions
Editing a flow
Full expressions in conditions
The rules of a Condition cut each value off, such as d/File/C… or empty(…).
Read every rule written out in full, without hovering each value.
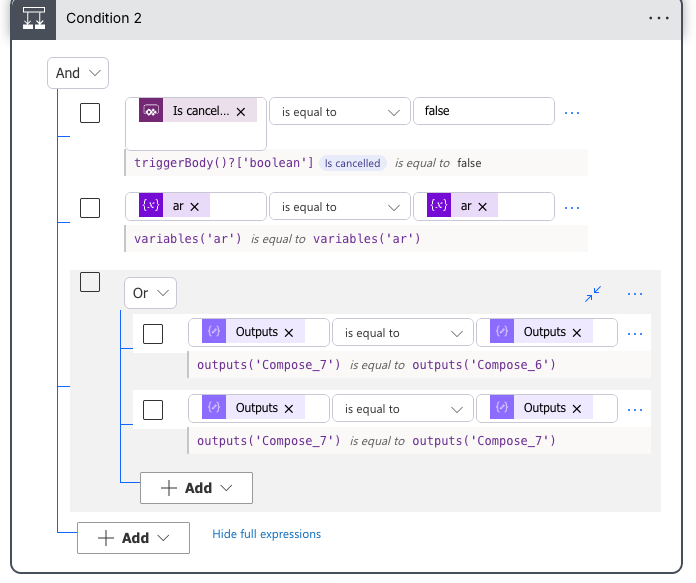
How to use it
- Expand a Condition, or a Filter array or Do until with multiple conditions.
- Select Full expressions next to + Add.
- Each rule gets a line under it with its first value, the operator and its second value in full. Hide full expressions removes the lines again.
Good to know
- The choice holds for every Condition, in every flow, until you change it.
- An input of a manual or Power Apps (V2) trigger, such as
triggerBody()?['boolean'], shows the name it has in the trigger next to it, such as Is cancelled. The tooltip of its token shows that name too, also without the lines, and so does Condition rules in a run. - In a flow run, the Conditions panel of Condition rules in a run has Full expressions in its header too. It is the same choice: switching it there switches it in the editor.
- The lines are only shown; the flow itself does not change.
Switch in the settings window: Full expressions in conditions
Editing a flow
JSON editor
A flow is one JSON definition, but the classic designer only shows it read-only in Peek code. The extension lets you edit it, for the whole flow or for one action, and loads the result into the designer.
How to use it
- Select JSON in the command bar for the whole flow, or Edit JSON in the … menu of a card for that action.
- Edit the JSON.
- Select Apply, or press Cmd/Ctrl+Enter. The cards show the change.
- Check the flow, and select Save yourself.
Good to know
- Apply does not save. Undo in the command bar reverts it.
- Invalid JSON is not applied: the editor names the line and column and selects the error.
- Cmd/Ctrl+F searches and replaces; Format indents the JSON again.
- A loop, scope, condition or switch includes its actions. Rename an action with Rename, not in the JSON.
Switch in the settings window: JSON editor
Editing a flow
Large schema editor
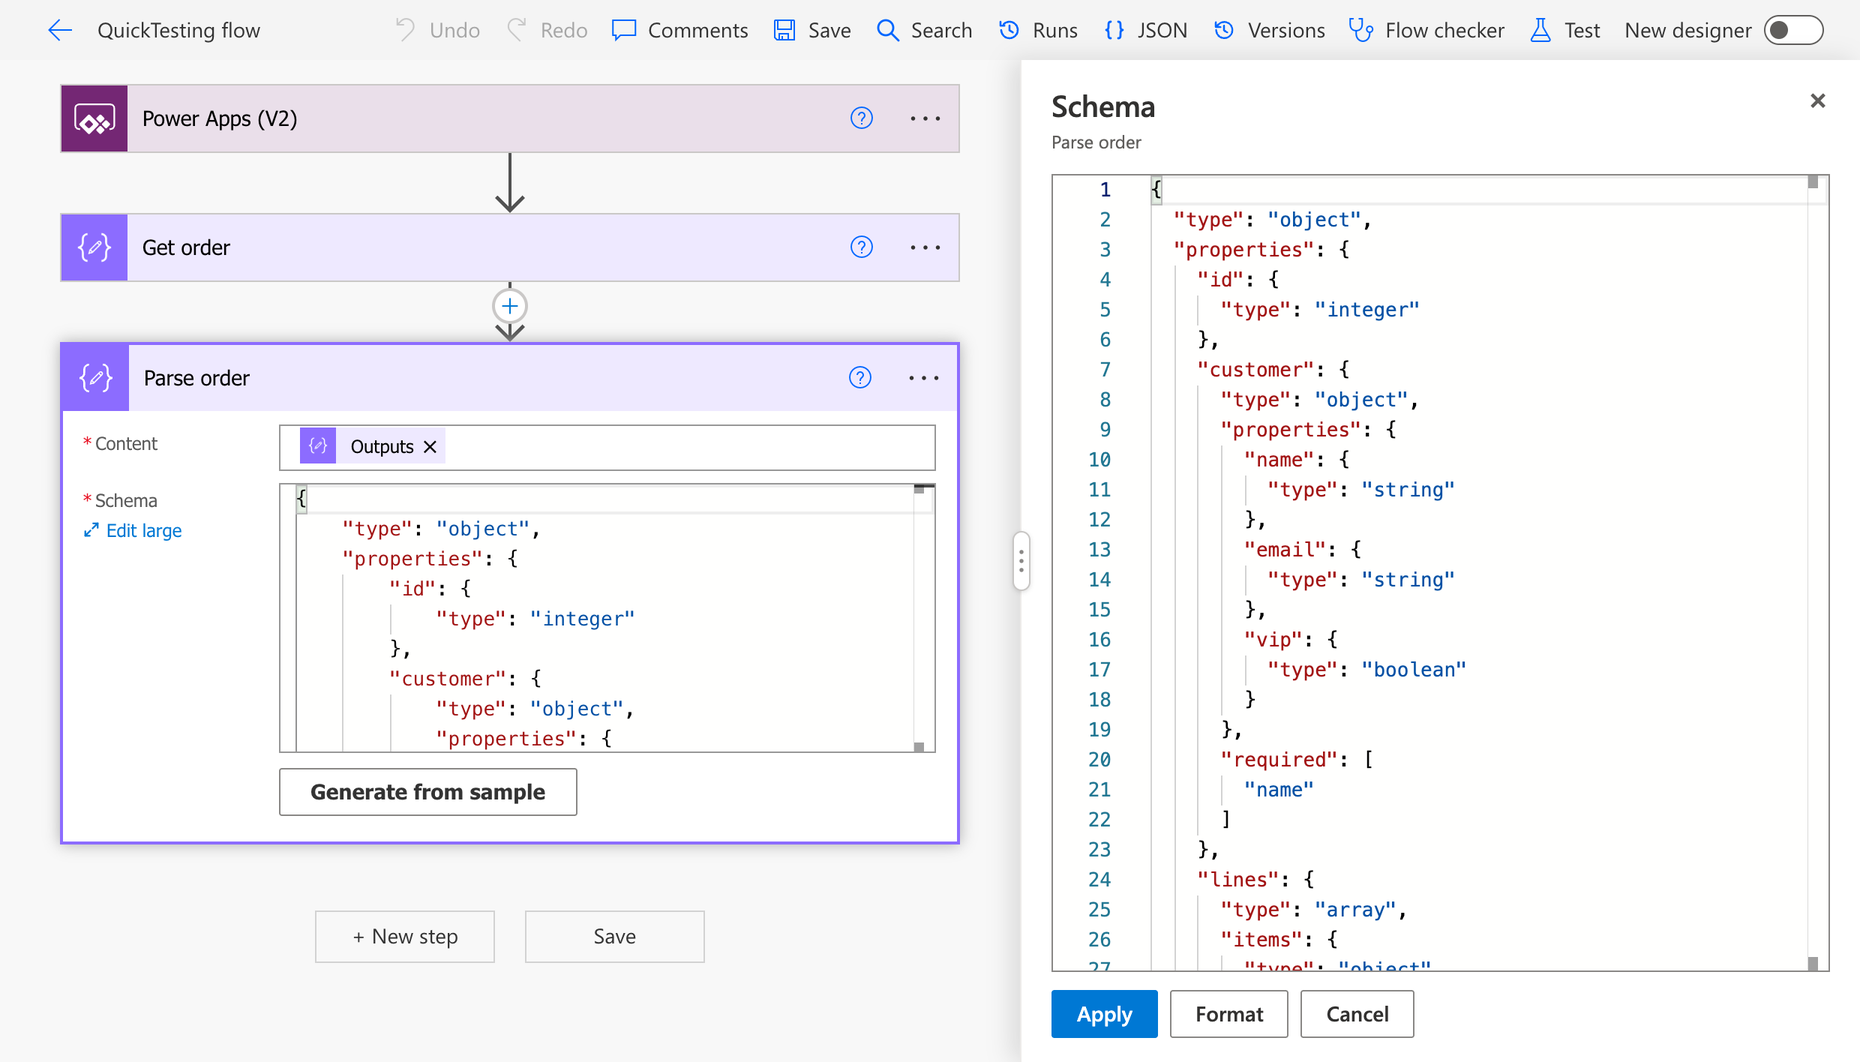
The schema of Parse JSON, of the trigger When a HTTP request is received and of Response is a small code box in the card. Open it in a large editor instead.
How to use it
- Open the card, and select Edit large under the label of the schema (in the trigger, next to it). In Response, the schema is under Show advanced options.
- Edit the schema in the panel on the right.
- Select Apply, or press Cmd/Ctrl+Enter. The field shows the new schema.
Good to know
- Format indents the schema; invalid JSON is not applied.
- Cmd/Ctrl+Z in the field takes an Apply back. Nothing is saved until you select Save.
- Drag the grip on the left edge of the panel to make it wider.
Switch in the settings window: Large schema editor
Saving, versions and speed
Safe save
The designer only takes in a new value when you leave the field, and with many cards open that takes up to a second. A Save in that time can save the old value. Safe save prevents that.
What happens when you save
- The extension takes the focus out of the field you were editing.
- It waits until the designer has processed the change, at most 4 seconds.
- Then it presses Save for you.
Usually that adds about 0.3 seconds.
Switch in the settings window: Safe save
Saving, versions and speed
Flow versions Soon in 4.0
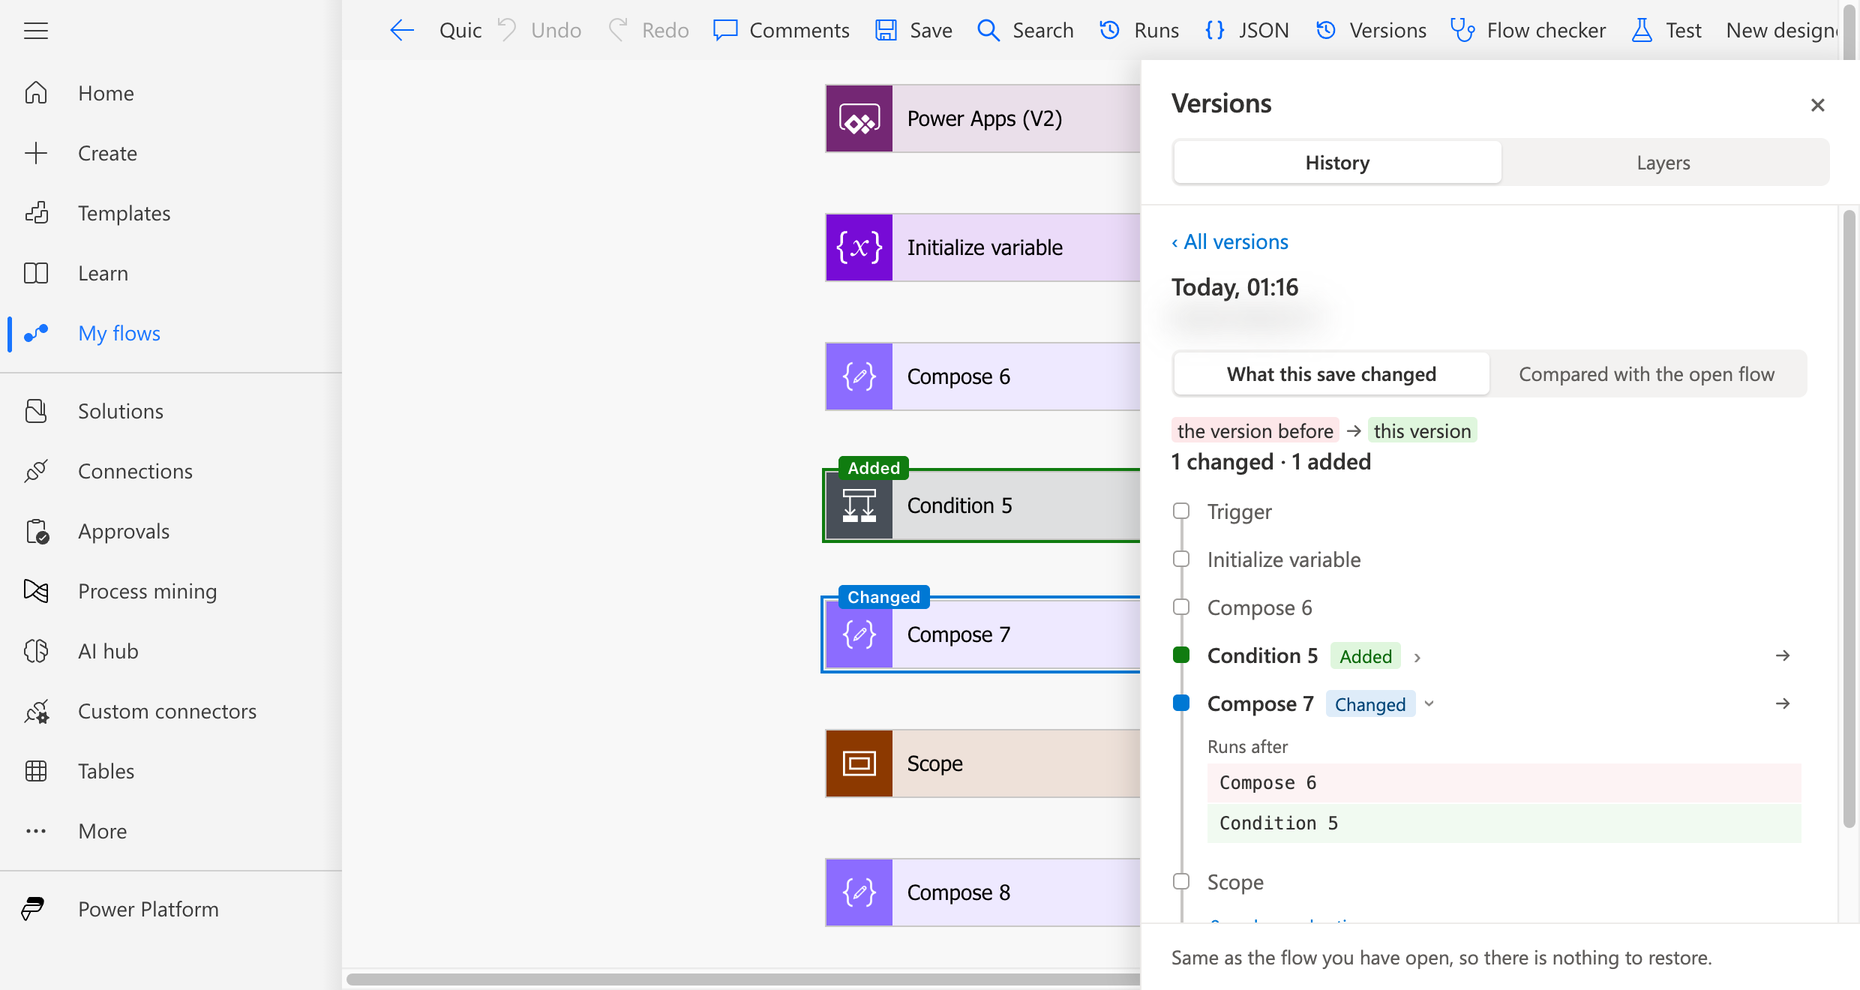
See every saved version of a flow, exactly what changed in each, and go back to one. Also shows what differs between the solution layers of a flow.
How versions are stored depends on whether the flow is in a solution: see below.
How to use it
- Select Versions in the command bar of the classic designer.
- Select a version. What this save changed compares it with the save before it, and shows the flow as a small map, with each change at its place: changed, added, renamed, and an action that was removed struck through where it stood. Long stretches without a change are folded.
- Select a line to see the old value in red and the new one in green.
- The cards on the canvas get the same marks, and a closed block with a change in it says Changes inside. Select a marked card to find it on the map; the arrow on a line goes the other way.
- Compared with the open flow shows how it differs from the flow in the designer. The oldest version has no save before it, so it starts here.
- Restore this version first asks, and says what would change. Load this version then puts it in the designer. Nothing is saved yet: Save keeps it, Undo goes back. A version that is the same as the open flow has nothing to restore, so it has no button.
Solution layers
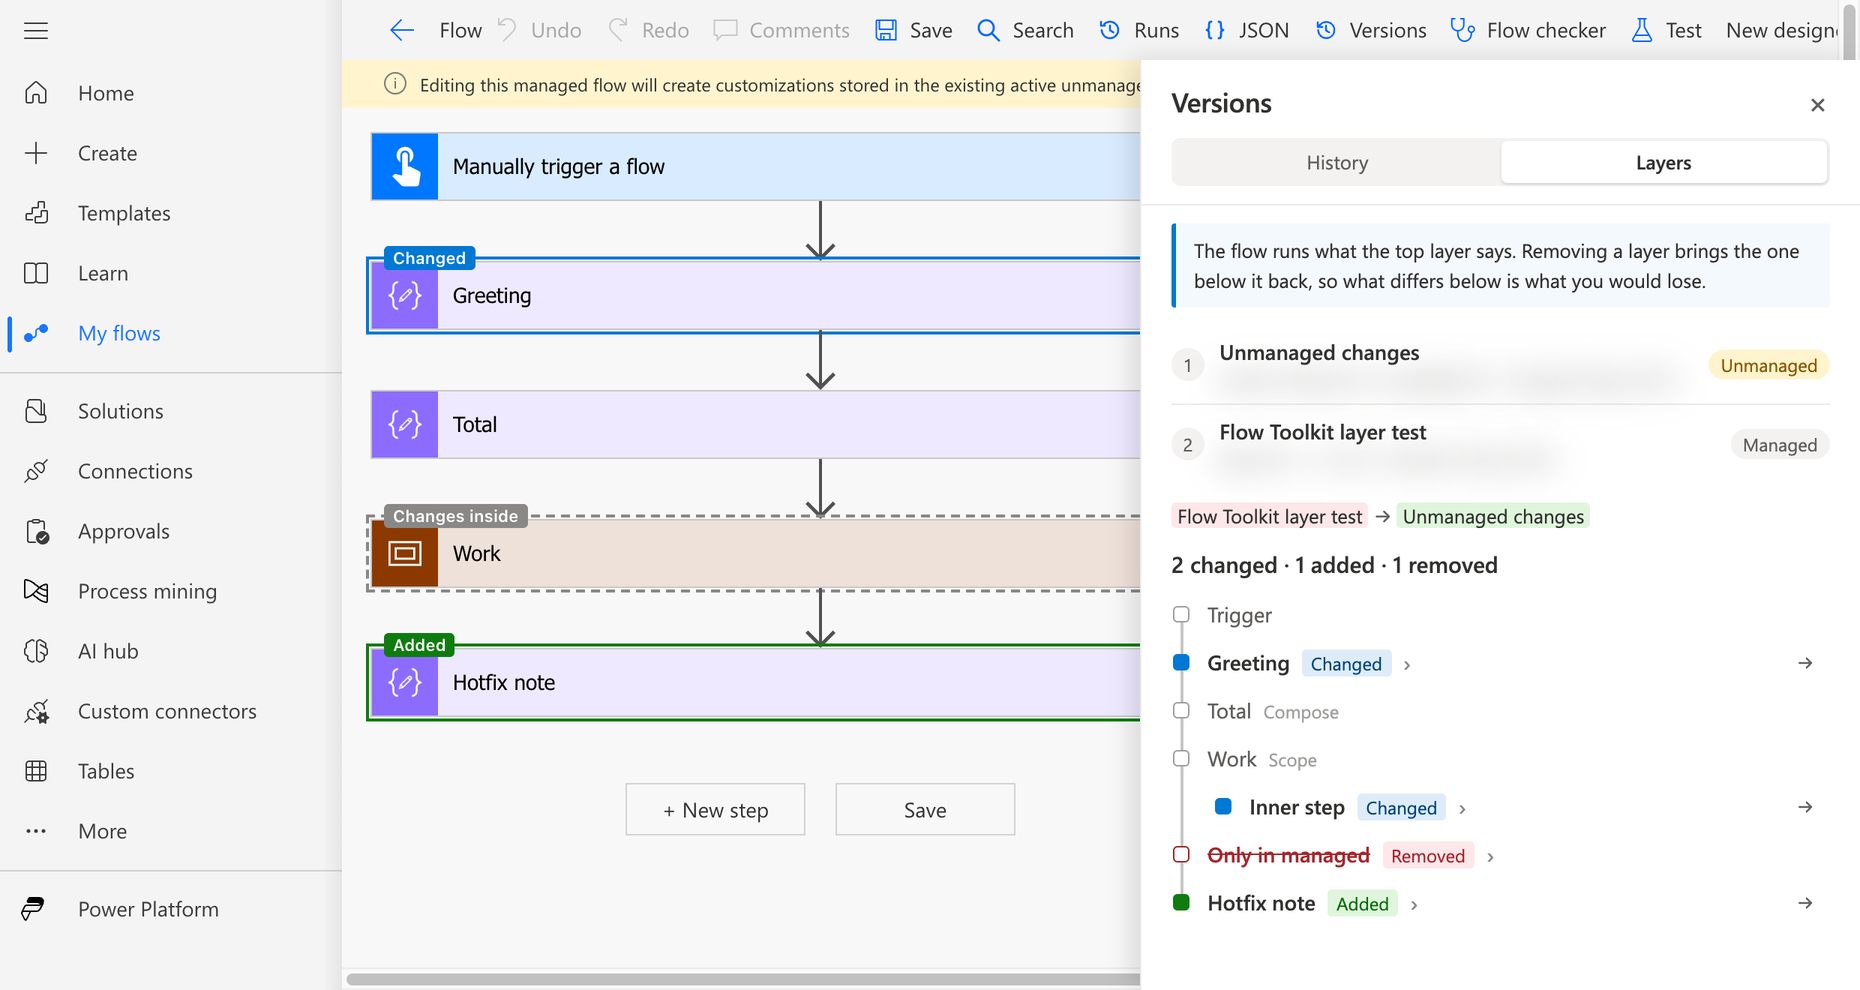
- Open a flow in a solution, then Versions and Layers. The flow runs what the top layer says. Each managed layer shows its solution, version and install date.
- With unmanaged changes over a managed solution, the map shows exactly what those changes changed. That is what you lose when you remove the unmanaged layer.
- With more than two layers, From and To choose which two.
Good to know
- A save that changed nothing, often only Power Automate writing the sign-in of a connection another way, is hidden from the list. The line above the list says how many; Show them shows them with No changes. The newest saves are checked first, older ones as you scroll down.
- The panel is wider when you drag the grip on its left edge; a double-click gives the default width.
- An import is not a version. For a managed flow, the list starts at the first save in this environment; use Layers to compare with the managed solution.
- Restore loads the version into the designer, where the modern designer makes a new draft.
- Showing layers needs read rights on them in Dataverse. Without those, the tab says so.
Where versions are kept
In a solution, Power Automate keeps the versions, and the extension only shows them. Outside a solution, Power Automate keeps none. The extension can keep copies in your browser, but only for a flow where you select Keep copies in this browser in the panel.
| Flow in a solution | Flow outside a solution | |
|---|---|---|
| Kept by | Power Automate (Dataverse), per flow and environment | The extension, per flow in this Chrome profile, only when you choose it |
| Colleagues see | The same history, with who saved each version, also from the modern designer | Their own copies only |
| What is in it | Every save, by anyone | Your saves here, and what was saved when you opened the flow; saves in between are missed |
| How long | Microsoft keeps published versions 12 months, drafts 6 | The last 50, until you stop or the site data of Power Automate is cleared |
DEV, TEST and PROD each have their own history: a solution export takes no versions along.
Keys and passwords. A copy holds the whole flow. A key or password written in the flow as plain text ends up unencrypted in your Chrome profile, and stays there after you remove it from the flow. So don't keep copies on a shared computer, and better still, keep secrets out of the flow, for example in Azure Key Vault. Stop and delete copies in the panel removes the copies of a flow.
Switch in the settings window: Flow versions
Saving, versions and speed
Faster rendering
With many cards open, the classic designer freezes for a second or more after each click in a field. The extension removes most of that wait.
- Less redrawing. After a change, the designer redraws every card of the flow. With this option, the card you work in redraws right away, and the others catch up a moment later, while you continue.
- No waiting for the popup. The designer waits 250 ms before it shows a change. After a click in a field, the extension skips that wait, so the dynamic content popup appears almost at once.
In a flow with 70 open actions, a click in a field went from 1.0–1.7 seconds to 0.3–0.6 seconds.
Switch in the settings window: Faster rendering (on by default)
Look
Themes
Give the classic designer a fresher look, closer to the new designer, without changing how it works.
- Classic: the designer as Microsoft made it. This is the default.
- Modern: cards with rounded corners and a soft shadow, on a dotted canvas.
- Minimal: flat white cards with a small rounded icon, on a plain light canvas.
- Midnight: rounded light cards on a dark dotted canvas.
- Nord: cool blue-grey canvas and cards, after the Nord palette.
- Sand: warm paper canvas with softly rounded cards.
- High contrast: white cards with dark borders, no shadow, solid black arrows and strong outlines for the selected card.
- Compact: like Modern, with lower card headers and shorter arrows between the cards, so more of a flow fits.
- Retro: square grey cards with a beveled frame on a teal canvas, like Windows 95.
Every theme other than Classic also gives arrows that are lighter (solid black in High contrast), action names in bold, and rounded fields and buttons. The selected card keeps its purple border. Below, the nine looks in turn, and then the Modern theme:
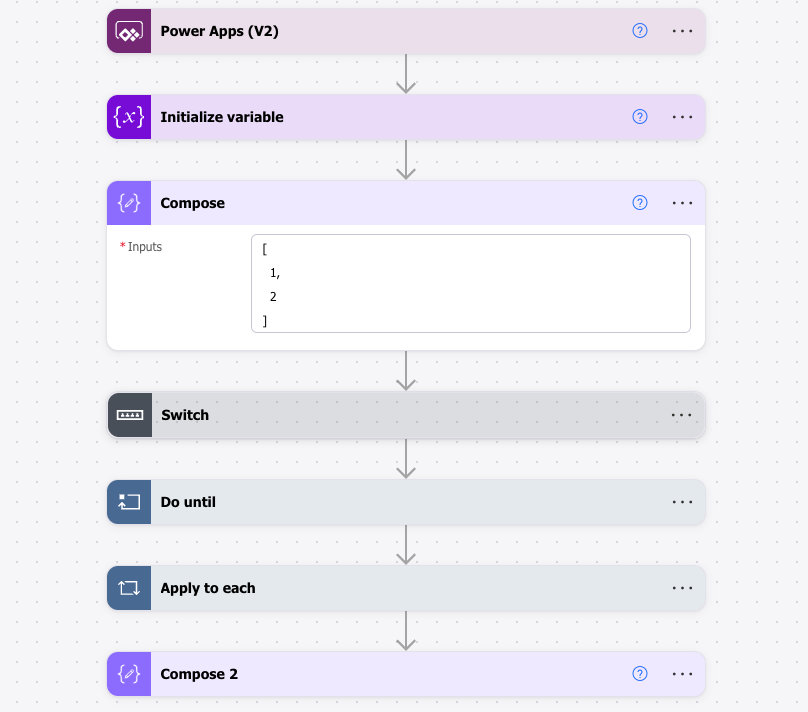
The colors of the connectors stay as they are, so you still recognize your actions at a glance.
The dynamic content and expression popup gets the same softer look. It has rounded corners, a soft shadow and no arrow, purple underlined tabs, a rounded search field, calm list items, a lightly framed expression editor and a filled purple OK or Update button, with outlined Format and One line buttons. The popup follows the theme: dark in Midnight, beveled and square in Retro. The code editor inside stays white, and Classic is unchanged.
Choose it in the extension popup, under Theme, or under Appearance in the settings window (Classic by default)
Look
Font of the action names
Choose the font and weight of the names on the cards, with or without a theme.
- Default font: the designer's own font. This is the default.
- System: the font of your computer, San Francisco on a Mac and Segoe UI on Windows.
- Inter, Roboto, Open Sans, Montserrat and Poppins: popular modern fonts, included in the extension.
- Serif: a font with serifs, such as Charter or Georgia.
- Mono: a monospace font, a little smaller.
The weight is Default weight, Regular, Semibold or Bold. The included fonts come with the extension, so nothing is downloaded from the internet.
Choose it in the extension popup, under Action names, or under Appearance in the settings window (the designer's own font by default)
Look
Smooth expand
When you open a card, its contents fade in with a small slide instead of appearing at once. When you close it, they fade out while the card shrinks.
Both take 150 ms and only affect the card you open or close. Opening only fades: the card gets its full height at once. Closing all cards at once, a card in a flow run, a Condition and a very tall card close without the animation, and it is off when your computer is set to reduce motion.
Turn it on or off in the extension popup, under Smooth expand in the Theme card, or under Appearance in the settings window (on by default)
Reference
Keyboard shortcuts
| Action | Mac | Windows |
|---|---|---|
| Switch between the classic and modern designer | Option+Shift+D | Alt+Shift+D |
| Large expression editor on or off | Option+Shift+X | Alt+Shift+X |
| Search the actions of the flow | Option+Shift+F | Alt+Shift+F |
| Collapse all cards | Option+Shift+C | Alt+Shift+C |
| Confirm the expression | Cmd+Enter | Ctrl+Enter |
| A new line with indentation (with Indent on Enter on) | Enter | Enter |
| A line break without indentation | Shift+Enter | Shift+Enter |
| Format the expression, or back to one line | Cmd+Shift+F | Ctrl+Shift+F |
| Select a card, or take it out of the selection | Cmd+click | Ctrl+click |
| Save the flow (with Safe save on) | Cmd+S | Ctrl+S |
Change the first four on chrome://extensions/shortcuts, or via
Change shortcuts in the extension popup.
Reference
Turning features on and off
Every feature has a switch in the settings window. Open it with Open all settings, or one of the groups, under Features in the extension popup. The window opens in the middle of the browser window, groups the features, has a search box, a Guide button and a How it works link per feature, and stays open next to Power Automate; a change applies right away. Its Appearance group has the theme, the font of the action names and Smooth expand, the same choices as in the popup. All are on by default, except Center expression popup and Pan with left button. A setting you changed says Changed, with its default, and Reset changed settings under the groups puts them all back after a confirm. With a switch off, that part of the designer works exactly as Microsoft made it.

- Confirm with the keyboard, Collapse all cards, Keep your place, the handle that moves the popup and panning with the middle button have no switch and are always available.
- With the modern designer selected, most switches are grayed out. They keep their setting for when you switch back.
- Filter runs, Filter flows and Resizable flow columns work on pages outside the designer, so they also work with the modern designer selected. Their switches stay available and say Also in modern. Only the Runs button in the designer needs the classic designer. Soon in 4.0
Turn Flow Toolkit off Soon in 4.0
The power button in the header of the popup turns the whole extension off, without uninstalling it. Power Automate then works exactly as Microsoft made it: the designer is no longer switched, every addition leaves the open tabs at once, and the keyboard shortcuts, the tour and What's new stay away. The toolbar badge shows OFF, and the popup and the settings window say so. Your settings stay; select the power button again to bring everything back.
Check features
The extension relies on parts of the designer that Microsoft can change without notice. A feature then stops working, without an error. With a flow open in the classic designer, select Check features at the bottom of the popup. Each feature shows Works, Problem, Not checked or Off.
Experimental Features in Power Automate Soon in 4.0
With Experimental Features on in Power Automate, the expression features of this extension don't work. The extension warns you: once in the classic designer, and in the popup for as long as the setting is on. To turn it off, select the gear icon in Power Automate, then View all Power Automate settings, set Experimental Features to Off and select Save. The setting is per account.
What's new
After an update with new features, a dialog like the tour pages through them, once, one card per feature, with a Learn more link to the matching section. It includes what changed in versions you skipped. Skip or Done closes it, also on your other computers. To see it again later, select What's new at the bottom of the popup. The changelog lists every version.
Feedback and reviews
Found a bug or have an idea? Send feedback, or select Feedback at the bottom of the popup. The form fills in the version of the extension and of your browser, and asks for your email only if you'd like a reply. If the extension helps you, a review in the Chrome Web Store helps others find it. The popup asks for one once, a week after you install or update it.